2009-08-07

Some Useful Tips For Web Conference Training

Companies and organizations today use web conferencing in many aspects of their organizations-to conduct meetings, collaborate on projects, demonstrate products and services, and more. Learning to use web conferencing technology is pretty easy, but there is a lot more to training via web conference than just putting on a headset, dialing up an audio-conferencing bridge, and logging onto the application.
This article offers some helpful tips specifically targeted to web conference training:...
  • Even though you are using web conferencing to deliver training, the training content itself must still be planned and crafted just as carefully as if it were for a traditional classroom session or e-Learning course.

  • When developing PowerPoint slides to use in web conference training follow these guidelines:

    • Simplify content.
    • Use a large, bold, simple font like Arial.

    • Have no more than 6 to 8 lines of text per page (fewer are better).

    • Make no more than 4 to 5 training points per page (fewer are better).

    • Use plain backgrounds that contrast well with the text without clashing.

    • If possible, avoid complex animations (i.e. no spinning text, etc.).


  • Establish one person as the point of contact, (POC) for communicating with their group of attendees. Provide all information to this one person and let them communicate it to their own people.

  • Provide an outline of objectives for attendees prior to the conference.

  • Test all aspects of your presentation ahead of time. (Enlist the help of an online facilitator or a student for these tests.):

    • Check your phone lines and headset, and replace weak batteries with full new sets.

    • Though most web conference technologies automatically run a short program to install and test your machine, open your own test conference and run your presentation. Confirm that your machine won’t freeze up because of low PC memory or connection speed.

    • Check any online exercises, tests, or polling questions you have planned for the session.

    • Run through the presentation twice, to both check its timing and leave ample time for questions and answers.


  • If student answers are being stored in a database or a learning management system (LMS), determine how they will be scored, saved, and accessed later.

  • Are you using an electronic whiteboard? Check to see how its images will be stored. Will your students need them later? How can they access this material? Is it something you can post in a reference area on your training LMS?

  • If you are going to demonstrate with examples, try to keep them relevant to the audience. It’s easier for people to learn when material is presented through examples that make sense to them.

  • Check how much background noise your system produces. Stage the actual conference in a quiet place, where you can control any heating or air conditioning noise. Be careful about rustling papers. And never eat anything or chew gum during the conference.

  • Will a host introduce you or will you have a guest presenter during the web conference? If so, you’ll need to run through all of things discussed in item 5 with the other participant.

  • Do you or your guest tend to run long? If so, you may want to use cue cards. Or use a second computer (or laptop) as a time clock, to signal when someone is running long.

  • Limit each session to 60 – 90 minutes. Longer sessions are not productive.

  • Limit your audience. When possible, keep the number of people attending small. (No more than six people are best.)

  • You might want to ask your technical people to set up a dual monitor configuration on your PC (or laptops) for you, so that your presentation appears on one display (as others are seeing it), while your delivery screens and notes appear on the other.

  • If appropriate, check time zones before scheduling the web conference. You’d be amazed how often even experienced trainers forget to do this.and end up opening a conference at the wrong time.

  • Related to item 15, check in advance to make sure that dates and times appear correctly in all meeting listings and notification messages. Confirm that the dates and times you define are communicated consistently to all participants.

  • Check ahead of time that all online links through which students can join the web conference will work… whether they are delivered to learners in an LMS message, via email, or on a web page.

  • If any learners are located in other organizations, try a test connect into their facilities well before the actual conference. Though rare, their IT departments may need to change some firewall settings before you’ll be able to communicate in.

  • Have more than one Web Conference option ready to use. Then, if some participants can’t connect, you can create a new conference on the spot, with different conference tools.

  • Generally, you do not want people to join a web conference until it is actually open for business. Depending on the system you use, you may be able to enforce this with a student display that says: "Cannot join until…"

  • Before starting, ask your POC if everyone is present and if it’s OK to begin.

  • During the actual conference, check in periodically by asking questions of the attendees. For example: "Does that make sense. Are there any questions so far? Can you think if an example where you might use this __________." This helps to ensure the attendees are attentive, and to see if they have any questions. Silence is a sign that the information is not being understood.

  • Try to stay "on course" but allow for flexibility. Often questions asked will take you to another topic area and may require more explanation than allowed in the allotted time. Try to answer all questions and offer to follow up with more information offline, or in another conference, when time is limited.

  • When you get close to the end, if you feel like you might run over or need a few extra minutes to finish up, stop and check with all participants. Be considerate of others’ schedules.

  • Provide training exercises on the topics discussed.

  • Plan ahead for how you will close the session. Thank everyone for their time and attention, leave time for any closing comments or information, discuss next steps (if any), and review how you can be contacted (if needed).

  • Follow up with your learners after their web-conference training. This could be by email or perhaps even through a test to gauge their understanding of the material.

  • Keep a log of all training and notes. It can help improve your future training.
  • Originated by Mary Polley-Berte :http://elearningweekly.wordpress.com


    Read more ...

    2009-07-31

    Developing an Online Course in Moodle as Quickly as Possible

    I had a reader send me a question about how to estimate the time it will take to develop a course in Moodle. I'd like to share her question and my answer with you. As always, your comments and experiences are welcome.

    Her Question:
    I am just about to embark on my masters dissertation project, and am looking a web-based tutorials for teaching. At the moment I’m considering putting together a tutorial as part of the project using moodle (I have copies of your books in front of me now).One question I cannot seem to find an answer to, is realistically how long would it take for me to construct something like this? I have seen reports stating that construction of online courses can take up to 18 months, but I think these were from scratch as opposed to using a software programme such as moodle. I am fairly Internet literate, and have created basic webpages before, but have never done anything like construct my own online course.I am studying via distance learning and also have a full-time job. I have between now and June/July to work on my project (including analysis and user-testing, etc) – do you think this is something which I can realistically achieve in this kind of time frame? ....

    My Answer:
    In my experience, the old methods of determining how long it takes to develop courseware were never very accurate. With the variety of tools available to us today, the many different situations, and the many different expectations from learners and stakeholders, those old recommendations are even more inaccurate.
    I no longer ask, "How long will this take me to develop?" Instead I ask, "How long before the client needs it?" And then I determine what I can do between now and then. It sounds to me like you have a few hours a week to spend on developing an online course, between now and June. That's not much time. So instead of dwelling upon how long it will take, let's talk about how to maximize your output in the time that you do have.

    First, try to get out of installing Moodle yourself. If you can use an outside hosting service, find one that has a one-click install for Moodle. If you must use your organization's web server, try to get the web admin to install it for you. When Moodle installs without trouble, the installation goes quickly. When it gives trouble, you can spend hours tracking down the problem. If you pay a few dollars a month for a hosting service that will install Moodle for you, I advise it.

    Second, resolve to stay within Moodle's built-in capabilities. Some of the add-on modules add great functionality. But for a project working against time constaints, I advise you stick with Moodle's built-in functionality and not get bogged down in trying to get add-ons to work.

    Third, make as much use of existing material as possible. As a librarian, I'm sure you can locate web pages that you can use as course material. I think there's nothing wrong with a course whose learning material consists entirely of links to external web pages, video, and audio. For example, if I was teaching a course on public speaking, I might link to a funny Youtube video of public speaking bloopers, tips from Toastmasters, and famous speeches. Creating your own multimedia takes especially long, so I would search Creative Commons for media I could use in my course.

    Fourth, I would try to use Moodle's built-in Web page editor (Web page Resource) to write a short description of each resource that I link to, and what I want the students to pay attention to while viewing it, and what I'd like them to get out of it. To ensure that they read this before going to the resource, I would put the link to the resource on this web page instead of on the course's home page. Then, the students would need to go through the web page that I write before clicking through to the external web page/video/audio.

    Fifth, I would follow up each reading/viewing/listening resource with an activity created in Moodle. For example, I might ask the students to:
    contribute to an online discussion, and to rate other students' postings in that forum. (Forum activity)
    take a short quiz on the material (Quiz module)
    write a summary of the material and upload it (Assignment activity)
    record a snippet of speech and upload it (Assignment or Workshop activities).

    Sixth, I would use outside services for things that Moodle doesn't handle, or that it handles only with plug-ins. For example, after the students have completed viewing the resources and doing the follow-up activities, just before an exam, I might schedule a summary lecture with WebEx or GoToMeeting. The lecture could include a slide show of the material that will be on the final exam, whiteboarding, and chat. If possible, I would record the session and offer it to the students as a download.

    Seventh, I would offer an online exam open only at a given time, to ensure that students don't take the exam and pass along the answers.

    That would be my model for rapid development of an online course. And if I could, I would choose a topic for that course based upon the amount of good material freely available online.

    Originated by William Rice:http://williamriceinc.blogspot.com/

    Read more ...

    2009-07-29

    How to convert PowerPoint to Flash with Adobe Flash CS4

    "Convert PowerPoint to Flash" has been the hot topic on Internet. Put this phrase into Google or Bing, you can easily get a huge number of web links there. Comparing with PowerPoint, Flash has more advantages for circulating presentation online or offline. Flash can be played directly on every computer and Internet, while PowerPoint has many limitations; Flash can only be played and hardly to be edited by others; the size of the converted Flash presentation can be reduced to almost 80%.

    So we know "Convert PowerPoint to Flash" is a trend, but how to do that? Should you we do it with PowerPoint? So far Microsoft hasn't added this function in it. How about doing it with Adobe Flash? If you have the time and if you are familiar with Adobe Flash – then it can be one of your choices! Today let's see how to convert PowerPoint to Flash with Adobe Flash
    CS4
    .

    ....

    First, save the PowerPoint presentation as WMF files, it applies to PowerPoint 2007.

    1. Open your presentation in PowerPoint, click the Office button-> Save As-> Other Formats, then Save As dialog box appears, choose Windows Metafile (*.WMF) in the Save as type drop-down list, and click Save.

    convert PowerPoint to Flash with  Adobe Flash   CS4


    Notes: WMF is a vector format, and Flash accepts all vector formats. These WMF files can be resized without losing their resolution.

    2. A message window appears asking if you want to export every slide or just the current slide, click the Every Slide button. Then another massage window states the folder where the WMF slides have been saved.


    Secondly, import these WMF slides to Adobe Flash CS4.


    1. Open Adobe Flash CS4, create a new Flash document. Please select Action Script 2.0.


    convert PowerPoint to Flash with  Adobe Flash CS4


    2. Now choose File-> Import-> Import to Stage.


    convert PowerPoint to Flash with  Adobe Flash CS4


    3. Then the Import dialog box appears; select the folder where the WMF files were saved, and click the first file. Click Open.

    convert PowerPoint to Flash with  Adobe Flash CS4


    4. There will be a message asking if you want to import the entire sequence, click Yes.


    convert PowerPoint to Flash with  Adobe Flash CS4


    5. Then the files are imported to Adobe Flash CS4, go to File-> save-> save as the Flash (.FLA) file.


    convert PowerPoint to Flash with  Adobe Flash CS4


    6. Go to Modify -> Ungroup.


    convert PowerPoint to Flash with  Adobe Flash CS4


    Notes: The ungroup option converts all PowerPoint slide objects as individual components in Flash that can be animated using native Flash options.


    Thirdly, export the Flash file as an SWF file from Adobe Flash CS4.


    Notes: Before exporting the Flash FLA file to a SWF file, make sure that the WMF file dimension and the Flash movies dimensions are the same.

    1. Click on any of the imported images, then click Properties panel, you can see the dimension of this image.


    convert PowerPoint to Flash with  Adobe Flash CS4


    2. Click the Modify -> Document, then Document Properties dialog box appears; change the dimensions to match those of the imported WMF files, and at the same time do remember change the Frame rate to .25 fps. Then click OK.

    convert PowerPoint to Flash with  Adobe Flash CS4


    3. From the File menu, choose Export-> Export Movie.


    convert PowerPoint to Flash with  Adobe Flash CS4


    4. Choose the output folder, and then click OK to export.

    Then you can get the SWF files, the PowerPoint presentation is converted to Flash.


    Pay Attention:


    In this way you can only convert the whole presentation to the static images or bitmaps, all
    settings of timing, transition and animation cannot be saved. If the presentation contain some multi-media elements, such as music or video, it is obvious that all of them will become just static images or disappeared.

    If you think this tutorial is so complicate and verbose that you don’t spend time on it, and also want to
    prevent dynamic design and multi-media elements in your presentation from being converted to static/bitmap pictures, you can try some professional converting softwares, such as Wondeshare PPT2Flash, Articulate Presenter etc, all of them can as well help you converting PowerPoint to Flash with easier steps.


    Read more ...

    2009-07-10

    Social Learning Resouces

    I found a few valuable social learning resources. Take a look at these slideshows below for several perspectives and best practices for using social learning at your organization.
    Defining Your Social Learning Strategy


    Social Learning and Internal Communications


    Harnessing the Power of Social Networks in Teaching and Learning


    Social Learning Success Stories, Models, And Roles

    Also, be sure to check out these books:
    Groundswell: Winning in a World Transformed by Social Technologies
    SocialCorp: Social Media Goes Corporate (Voices That Matter)


    Read more ...

    2009-06-23

    How to Make a Quiz on Facebook

    As a popular social-networking website, Facebook is a great platform to have a collabrative learning for doing cases and sharing knowledge, it is also a useful teaching tool. Howerver, "How do I make a quiz on Facebook? " is a popular question facebookers distributed, this article will guide you how to make a quiz on facebook....

    Step 1 – Get the quiz app to make the quiz

    Log in to your Facebook account, go to http://www.facebook.com/home.php?#/apps/directory.php, then input "create quiz" in the search box, you will get more apps which could help you make quiz on facebook. Now, I will take Quiz Creator for example to show you how to create a quiz on facebook.


    Step 2 – Get the quiz app to make the quiz

    Click the Quiz Creator application. On the next page that appears, click the button Go To Application in the upper left corner. Another page will appear to ask you to allow the application to access your personal data. Click Allow. Finally, you’ll get to the page where you start creating the quiz.

    Step 3 – Enter some basic info about your quiz

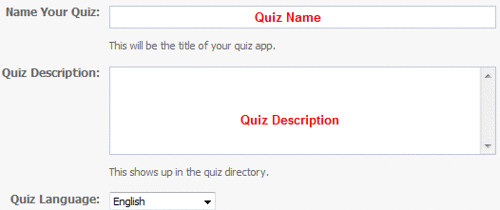
    Enter your quiz name and a short description for your quiz. You also could set th quiz language and visibility to the quiz. You are allowed to upload a picture for the quiz to make your quiz more popular if you like. And then, click Next to advance to the quiz result setting page.

    Step 4 –Enter quiz results for your quiz

    Specify the result title and description for your quiz, then people can get the results at the end of the quiz. You also could follow the prompts to upload a picture to accompany each result.

    Step 5 – Enter the questions for your quiz

    Enter the questions for your quiz, and pair the answers with the desired result. After inputting all the questions, click Next.

    Step 6 - Install the Developer App

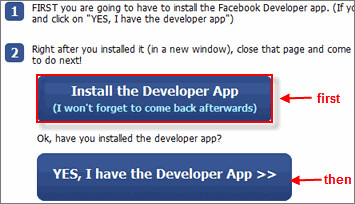
    On the pop-up new page, you will get a page with a giant button: Install the Developer App. Click it. Then, go back to the previous page, where there's another giant button: YES, I have the Developer App. Click that. You're going to need to follow a bunch of instructions to pop up a bunch of windows. Some of them will direct you to yet other windows. Just follow these instructions.

    Step 7 – Invite friends to try your quiz

    Congratulation. Your Quiz have successfully created and published, and please invite your friends to follow them.

    Of course, there are many quiz apps on facebook could help you make quizzes. All the quiz apps have its cons and pros. Howerver, the quiz creation steps are similar with this. You could pick any of these apps to make simple quiz for you. If you want to make multimedia Flash quiz, you could choose some professional flash quiz makers, such as Wondershare QuizCreator, that will help you create interactive quiz with ease.


    Read more ...

    2009-06-16

    5 Effective Ways to Create Online Quiz

    Online quiz becomes more and more prevalent in the web 2.0 era. For bloggers or webmasters, quiz is an outstanding way for engaging readers and growing blog or Web site traffic. For trainers, online quiz is a good e-assessment authoring tool. For business men, an online quiz can also be used as a sales tool. Here are 5 ways to create quiz for online use.

    1. Create quiz with desktop Flash quiz maker

    Some Flash quiz makers supply an easy way to create professional Flash quiz in minutes. With them, you could create Flash-based quizzes with images, sounds, narrations and Flash animations with up to 10 question types. You also could set feedback to each questions and randomize questions and answers. Some quiz maker also supply free quiz result tracking system, like QuizCreator. Users could track all the quiz results with email or free Quiz Management System. You could view the quiz below which is created by QuizCreator.


    2. Create Flash quiz with Adobe Flash

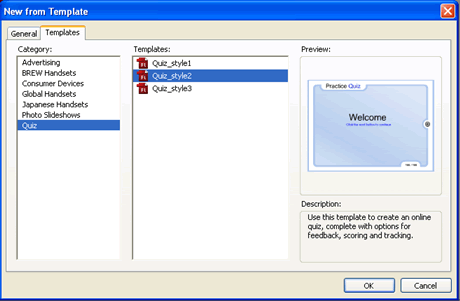
    If you are sophisticated with Adobe Flash editing, you could use Adobe Flash to make quiz for you. Adobe Flash MX and above versions have quiz templates included, and it is designed to automatically track results and send them to a learning management system configured for your quiz. Here is a tutorial about how to create Create a Quiz with Free Quiz Template with Adobe Flash.

    http://www.sameshow.com/quiz-creator/flash-quiz-adobe-flash.html?page=110


    3. Create quiz with php Script or JavaScript

    If you are familiar with php script or JavaScript and HTML code, you could choose HTML code and script to create online quiz. Here are some tutorials to help you createquiz for your Web site.

    Create quiz with php script, please have a peek at:

    http://www.trap17.com/index.php/php-quiz-script_t8729.html.

    Create quiz with JavaScript, please have a peek at: http://www.spacefem.com/tutorials/typequiz.shtml.


    4. Create quiz via free online quiz creation tool

    There are numerous online quiz-building tools that can make quiz and grade less of a chore. Do a Google search for "make online quiz free", you will get many free online quiz tools.

    ProProfs is a free program that is supported by ads, lots of ads. So it is a totally free online quiz program. It features 3 question types. It has many options that control the behavior of your quiz. You could add multimedia objects such as video and image to the quiz, this is rare to a free online quiz tool. Quibblo and Classmarker also have such features. However, ProProfs sounds the most powerful for a free quiz creation tool.


    5. Create quiz with screen recorder

    Some screen recorder has the feature of quiz creation. As far as I know, Adobe Captivate and Tech Smith allow user create Flash quiz with them. Take Captivate for example, it contains advanced quizzing functionality that makes it easy to create your own robust quizzes and assessments.


    In summary, all these 5 ways could help you make quiz for online use. Which way works for you is depending on your use. For blogger, choose free online quiz creation tool is the best way, such way will generate the quiz code automatically, and the quiz code could be embedded to blogs. For webmasters, using HTML JavaScript or desktop quiz maker way will be perfect. You could make professional flash quiz to engage the visitors. For trainers, please choose the desktop quiz maker to create Flash quiz. On the one hand, you could engage the learners by adding multimedia objects to the quiz with desktop quiz maker. On the other hand, you could use quiz result tracking system to track learners' quiz results without hassles.


    Read more ...

    2009-06-12

    Free Flash tool for Online Teaching - ClassTools.net

    I found a very cool yet free teaching tool (Classtools.net) these days, it will be a good tool for teacher teaching online. Classtools.net allows everyone to create free educational games, activities and diagrams in a Flash! And then host them on your own blog, website or intranet! No signup, no passwords, no charge!


    You may have such question: Why these resources on classtools.net free of charge? What does it rely on to operate well? Yes! The site is supported by Google Ads. So, there is no charge for creating resources with any of these templates. What's more, each template can be saved as a stand-alone HTML file or as a Widget that can be embedded into a blog or wiki.

    Right now, there are 17 templates that are available for teachers to fill in the blanks and images
    . You could go to http://classtools.net/samples/full_list/ to view more.

    Classtools.net is a very useful teaching tool for teachers, you could try out it in your online classes.


    Read more ...
     
    Software